Feeds:
Posts
Comments

Posts Tagged ‘onions’

From the earliest time that I can remember, my parents have always had a fruit bowl out in the open where we could pick and choose something to eat at any given point. I can remember it was always full of apples and bananas if nothing else, and other seasonal produce…ok, I’m not THAT old but when I was a kid, you didn’t get the all year-round fruit choice that we have nowadays!

I wasn’t a big fruit lover as a child, it was more of a chore but my father always pushed me to eat with the same mantra all the time. Fruit is good for you, it will make your skin shine, will make your hair shine and I was always rather skeptical of this and therefore ate as little as possible!

One fruit that I did really like and enjoy though, was an unfamiliar round object that my grandmother would bring over on her trips to England from Iran. She would have a bag of them in her suitcase (something that would in no way be allowed now!) and she would pop them in the fridge until we were all together.

When we finally were, she would bring them out with a huge chopping board and cut them into large pieces and I remember dark red juices flowing onto the board while she portioned them on plates for us all to eat. The ‘Anar’ as we knew it was a delicious sweet yet tangy treat that we would only have when grandma was here. We even had different ways of eating it. My father would crush the fruit without breaking the skin and when he was satisfied it was soft enough, he would bite out a bit of the skin and drink from it! My mother would take all the little jewel like bits from the inside, separate them from the pith and place them into a bowl, sprinkle salt or sugar (depending on her mood) over it and eat it all with a spoon. For my untrained hands, I would just bite the whole thing spitting out bits of peel and getting very red in the process!
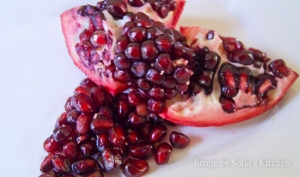
*The beautiful Pomegranate is said to be native to Persia since ancient times and cultivated in surrounding areas such as Pakistan, Afghanistan and North India. It was also introduced to Latin America and California in the late 1700’s. Nowadays we can find Pomegranates in most supermarkets and in a variety of different ways. You can find cartons of juice and also fruit packs that contain a handful of little ‘arils’ (the tiny jewel like fruit pieces of the pomegranate).
 
Indeed we now know more about the medicinal benefits of the Pomegranate, for example, the juice provides 16% of an adults daily vitamin C requirement and also is a good source of vitamin B5. It is also said to have antioxidant properties but proof is yet to be found regarding this. Perhaps it really does make your hair shine!!
 
Another tradition in Iran when having guests around is to serve a drink upon their arrival. After travelling in the hot sun for hours (getting from one side of the city to the other in Tehran traffic can take well over an hour!) you want something cool and refreshing to strip away the heat. Strangely enough, hot tea is served alongside tall glasses of ice cold juice made from a thick syrupy concentrate of either lemon or pomegranate as well as other varieties.
 
At the moment, the concentrate is not imported into the U.K but you can find Pomegranate puree in most Asian stores around the country which will do the trick. A tiny amount in a tall glass with water and ice topped with a sprig of mint gives a very refreshing taste on a hot summers day.
 
It is also widely used in Persian cooking. The arils can be used in soups and salads or the more popular dish of Khoresh e Fesenjoun. This is an extremely thick casserole of chicken in a very tangy sauce of pomegranate puree and crushed walnuts. My personal favourite however is the Northern Iranian dish called Gilasheh. Chicken livers sauteed with onions in a sauce of tomato and pomegranate purees and demerera sugar. For an added extra, you can sprinkle in a teaspoon of cinammon and serve with Iranian flatbread (nan e lavash) or the Arabic Khoubz (again, both found in most Asian stores).
 
I have added the recipe here for Khoresh e Fesenjoun. Be warned that this is a very time consuming dish and not for everyone’s palate. Definitely not one to try with younger children as they may not appreciate the sweet and sour taste this dish exudes. You should end up with a very dark, thick casserole of almost a dark purple colour.
 
Khoresh e Fesenjoun (image to come soon)
 
Ingredients:
Serves 4-6 people
 
2 medium onions, diced
8 tbsp vegetable oil
500g finely crushed walnuts
1/2 pint water
800g chicken breast, diced
150ml pomegranate puree
salt to taste
¼ tsp turmeric
¼ – ½ cup sugar (to taste)
 
 
1. Sauté in 4 tablespoon vegetable oil until golden brown. Take extra precaution to not burn the onion or have the edges black. Once complete, strain onion from the oil. Discard oil.
 
2. Mix the finely crushed walnuts and water together. If it is too thick, add a little more water until the consistency is ‘runny’.
 
3. In a large casserole pot, over medium-high heat, bring the walnut mixture to a gentle boil- constantly stirring to prevent settling of the walnut on the bottom of the pot and also to prevent the mixture from boiling over. Again, add cold water to the mixture if needed to create a runny consistency. Bring the heat down low and continue to stir for an hour.
 
4. Add onions to the mixture and continue to stir.
 
5. Add ½ tsp. salt and pomegranate puree to the walnut mixture and continue to simmer over low heat. Again continue to stir every thirty minutes to prevent settling of the walnut at the bottom of the pot. Allow mixture to boil for 3 hours to allow the walnuts to exude its natural oil. The finished consistency should be similar to runny porridge; if not, add cold water to the mix until a runny consistency is achieved. If the mixture has too much liquid, continue to boil until the excess liquid evaporates.
 
6. Add sugar (to taste) to the mixture and continue to simmer.
 
7. Meanwhile, in the same frying pan, heat remaining oil and lightly brown chicken pieces. Sprinkle turmeric and remaining salt. Do not fully cook pieces.
 
8. Add chicken and all of the juices and oil to the walnut mixture and continue to cook for another hour.
 
9. Taste the walnut mixture and add more salt or sugar to taste.
 
Serve with white rice and/or pitta or khoubz bread and slices of fresh onion to complement.
 
*Taken from various sources on the internet.


Read Full Post »

I am glad to say that I am not a total amateur when it comes to some things. In fact, I would go as far as saying that I am actually very very good at one thing…and that is cooking!

I come from a background that involved food. My parents were restaurateurs (now retired) and my father a chef. My mother ruled the roost at home and I have nothing but fond memories of all the delicious meals she would make. Unfortunately, my repertoire only stretches to making middle eastern or Persian dishes so whilst I learn to make a mean beef stroganoff or simple chicken pie (from scratch of course) you will have to bear with recipes that I’ve learned over the years that are a hit in any Persian household.

One night, I had no idea what to make for dinner for the children. I could have done a quick pasta but was bored with the idea myself as we’d only had pasta a few days ago so as I had some minced beef out already, I decided to make something that I grew up on. Pan fried kebabs served with fluffy white rice.
 
 
For this, you need a very good non stick frying pan. Mine isn’t a good one..as you can see from the picture, the kebabs were a little *over-done* and that is due to the pan being no good after many years of being used to the brink of it’s own extinction. The tomatoes make a good mixer with the white rice because there is no sauce. Iranians mix butter with their rice to make it less dry but tomatoes work just as well and is a slightly healthier option.
You can also add any kind of vegetables you want, it really doesn’t matter. We had mushrooms in so I just simply sauteed them in the pan with the tomatoes after the kebabs were made.

All you need is:

500g minced beef (or lamb)
1 medium onion, grated
2 heaped tbsp natural breadcrumbs
1tsp turmeric (optional)
salt and pepper to taste

Mix everything by hand in a bowl and make as many oval kebabs as you can. Don’t make them too thick otherwise they will take longer to cook through and end up burning on the outside. Don’t make the pan too hot and use 2 tbsp cooking oil and keep turning the kebabs. Have a plate ready at the side for the ones that get done first and as you get space add the others otherwise you’ll end up taking forever. We like to have crunchy vegetables with our meals so I have added radishes as a complement but a fresh salad will do the trick and give a bit more colour to the meal.

If you don’t fancy rice with it, pitta bread will do just as good. The preparation takes a bit of time but trust me, it will only take five minutes to eat it all and the children will LOVE it!

**If you don’t fancy minced meat, very thin slices of chicken breast will also do very nicely, or for vegetarian, a mix of more vegetables.  You can make a quick spicy sauce to go with the vegetables using 2 tbsp tomato puree, 1 tbs cooking oil, half a pint of water salt and pepper to taste, 1/2 tsp chilli powder (or none if you don’t want it hot), 1/2 tsp garlic powder and 1/2 tsp dried oregano.  Bring it to the boil, then simmer and reduce for 20 minutes.

Read Full Post »

Mini meatballs

Another easy but delicious favourite dish in our household are meatballs. Slightly spiced with a mild curry powder and in a thick and zesty tomato sauce, my children absolutely adore this and would have it every day if they could!

Of course meatballs can come in many sizes. I have seen meatballs the size of tennis balls served with pasta or just with crusty french baguette but here, we like them mini and definitely with rice!!

Here is my mini meatball recipe for you all and remember you can add any spices you please and mix with other vegetables if you don’t have broccoli or baby corn.

Meatballs

Preparation time 10 minutes

Cooking time 40 mins

Serves 4

Ingredients

300g lean minced beef

1 small onion, grated

2 heaped tbsp fine white breadcrumbs

salt and pepper to taste

2 tbsp tomato puree

4 tbsp vegetable oil

250g broccoli florets

200g baby corn, chopped

Method

Add the grated onion, breadcrumbs, salt and pepper to the minced beef and mix thoroughly.

Roll the meat into little balls about the size of a gobstopper or smaller.

Ready to cook!

Heat oil in a frying pan and fry the meatballs until they have firmed up and have turned a brown colour.

Transfer the meatballs to a medium size pot, add broccoli, baby corn and tomato puree. Cover with water and bring to the boil.

Simmer at a medium heat for 30 minutes to allow the sauce to thicken and stir occasionally.

Serve with rice or sliced baguettes.

If the kids don’t mind or you’re making for seasoned spice lovers, why not add 2 tsp medium curry powder and a fresh red chilli pepper finely chopped. Add a tin of tomato and 1 tbsp flour to thicken the sauce.

**Make your own breadcrumbs: Take half a loaf of sliced white bread and leave the slices out overnight to dry and harden. If you have a food processor you can mix the bread into a fine crumb mixture and keep stored in the fridge door in food bags. If not, just put the slices into a food bag and crush with a rolling pin until fine.**


Read Full Post »

I am so very proud to introduce my first GUEST POST! and who better to post a delicious recipe for us than my good friend and mentor, the fabulous Nicki Cawood!

Nicki is a freelance writer and blogs regularly on her own blog, Curly and Candid. When not surgically connected to the laptop, Nicki can be found in her kitchen which she describes as the hub of her home, surrounded by her family. Nicki’s husband Roy, and her two sons Kieran & Taylor are used to enjoying (usually!) her culinary experiments.
Today’s tried and tested recipe is her chunky slow cooked lasagne, perfect for autumn and winter teatimes!

Slow cooked lasagne.

I’ve been promising this recipe for a while and was being threatened with all sorts of violence for taking so long! I decided to use it for today’s guest post (which I also promised a while ago!), kill two birds and all that.

I am not a chef, I am Mum and wife who loves to cook and experiment so no fancy words, just (hopefully) a lovely family recipe which is filling, delicious and very easy to make.

Chunky Slow Cooked Lasagne.

800g beef mince

Large jar of bolognaise sauce (or 600g of homemade sauce)

Large jar of white sauce (or 600g of your own if you prefer),

Onions, chopped,

Chopped vegetables – choose anything you like, peppers, mushrooms, courgettes are good examples.

300g grated cheese

Lasagne sheets (I use 1.5packets of the Tesco value ones)

*These measurements are for a family sized, 6l slow cooker. You will need to adjust these if your cooker is smaller.

To make:

Gently cook off your mince with the onion, drain away any excess oil/fat.

In a pan with a little oil, toss your chunky veg until cooked through.

Add the mince and vegetables together and mix with your tomato sauce.

Layer up the show cooker with a layer of the mince mixture, then pasta sheets, then cover with white sauce, then a layer of pasta sheets, then white sauce, then pasta… Continue layering up until your mixture is gone but ensure the top layer is white sauce.

Cover the top with grated cheese and put the slow cooker on.

Delicious served with crusty bread, garlic or otherwise, and a green salad.

** How long and at what setting you put the cooker on depends on when you make your lasagne. I make mine at lunch time and put in on medium, and is ready for us to eat by 5.30pm. If making on a morning I’d suggest a low setting but the key is knowing your machine.

*To make this recipe suitable for vegetarians, simply replace the mince with an equal quantity of Quorn or extra chunky veg.

Enjoy!

Nicki Cawood, Mum, Freelance writer and blogger at Curly & Candid

Read Full Post »

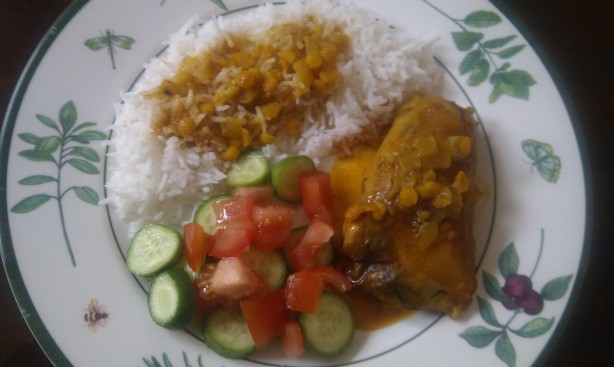
Everyone loves a good chicken dish. I know I certainly do. Roast chicken, chicken salad, fried chicken (ahem…) or chicken kebabs, I love all of them. My absolute favourite though, is a chicken casserole served with rice and a tomato and cucumber salad.

I like to combine *soft* spices with a mild curry powder to give it a bit of a zing and it certainly makes the cold days a bit more bearable on a Sunday afternoon around the table with your family or in front of the television watching a movie.

Here’s the recipe for a simple chicken casserole. Enjoy!

 Ingredients

4 chicken legs chopped into the drumstick and thigh (or diced chicken breast depending on preference)
1 large onion, finely chopped
1 tin chopped tomato
100g yellow split lentils (chana dal)
1 tsp mild curry powder
½ tsp turmeric
½ tsp cinnamon
½ tsp garlic salt
¼ tsp ground saffron
salt and pepper to taste

Method

Fry the onions in two tablespoons of oil for five minutes on a high heat then add the curry powder, turmeric, cinnamon, saffron, garlic salt and salt and pepper.

Fry for a further five minutes until soft, then add the chicken pieces. Make sure they are all covered with the onion and spice mix. Turn the heat down to medium and turn the pieces constantly for two minutes to prevent burning.

Add the tin of chopped tomato, cover with water, add the yellow split lentils, bring to the boil then simmer for one hour if using the chicken legs or thirty minutes if using the chicken breast.

Serve with fluffy rice and a chopped tomato and cucumber salad.

Read Full Post »